If you’ve been using Airtable’s great collaboration features for a while, you might be looking to link tables. This great feature can help teams save time and streamline working practices.

In this article, we’ll outline how to link and copy tables, create a booking system, add forms, and embed an Airtable. Plus, we’ll answer some burning questions that will help you better navigate the platform.
A Guide – How to Link Tables in Airtable
Firstly, let’s define what “to link something” means in terms of the platform. A linked field represents a mutual relationship between two objects. To link tables in Airtable, follow the steps below:
- Create a new table by clicking the Plus button in the bottom left corner.

- In the “Add Table” menu, name your table, and select “Done” in the top right corner of the screen.

- Add more tables if required.
- Your table names will appear in the tab at the bottom of the screen.

- To add records to your tables, click the Plus button.

- Fill out the necessary information.

- Click on one of the tables (i.e., “A”) from the tab and select the “Edit table” menu, then select the “Customize fields” button.

- Add a new field with the name of a table you want to link it to (i.e., “B”). Select the “Link to a record” type.

- Choose a table to link (i.e., “B”) from existing tables or create a new table.

- Click the “Save” button in the top right corner.

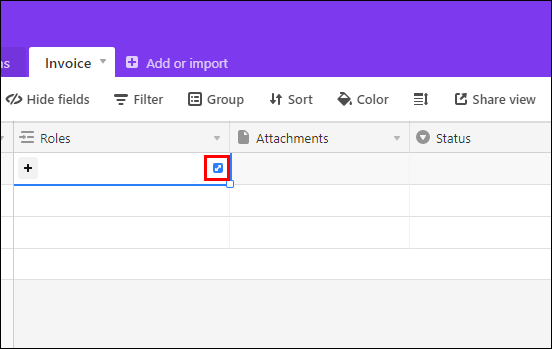
- Return to the main table menu, expand a record, and scroll down to find the new linking field.

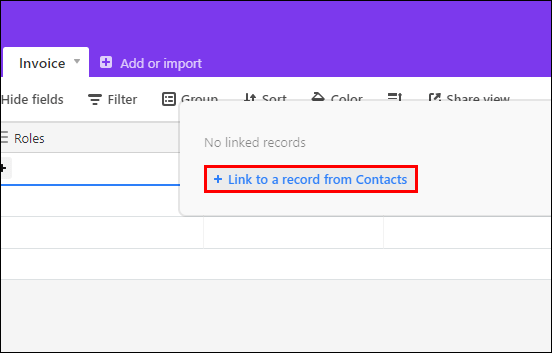
- Select the “+ Link to a record in the “B” table.” This will open a selection of records in the linked table.

- Select the records you want to link by simply clicking on them.

- Mutual links will be created automatically.

How to Create a Form in Airtable
Airtable forms are a powerful tools that automatically save collected information to a database. They may be used for various actions, from making polls and scheduling appointments to creating booking systems. Learn how to use Airtable forms below:
- Open a table containing the required data.
- In the “Find a view” bar, select the “Form” button.

- Name your form and add a description.

- The form fields are created automatically based on the linked table.
- To change the field order, click on a field and drag it.

- Select a field and click the “Hide” button in the top right corner to hide it.

- To add the field back, find it in the left sidebar and drag it.

- To add a new field, select the “+ Add a field to this table” from the left sidebar.

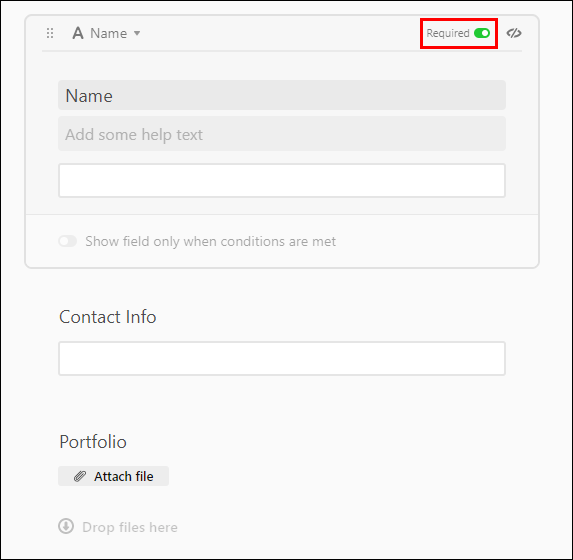
- To mark a field as required for the end-user, click on a field and shift the “Required” toggle button.

How to Create a Booking System in Airtable

Airtable’s booking systems facilitate the scheduling of appointments and meetings with the help of forms. Here’s how to create a booking system:
- Create two tables – the first for the records of your availability (i.e, “A”), and the second for scheduled meetings (i.e., “B”), containing information about the account, such as name and time.
- Link the tables.
- Select the “B” table from the tab above and create a new form.
- Customize the form if required.
- Select the linked records field for the time availability.
- Shift the “Limit record selection to a view” toggle button.
- Select an “Open times” view.
- Share the booking link with people who want to schedule an appointment.
Frequently Asked Questions
What Are Tables, Bases, Records, and Fields in Airtable?
It is essential to understand the definition of these items to better perceive the guidelines. A table contains a list of items of the same type. One or several tables form a base. Records and fields are the items in a table. The record is an individual item, and a field contains information on a record.
How Do I Embed an Airtable?
To embed an Airtable, a webpage has to support iframes. First, click the “Share” button (found in the top right corner of the table view.) You then have to select the “Create a shared link to the whole base” option, which shows a dropdown menu of users. If you click the “Private read-only link” option, a share link for the base will be created.
To preview the page, click the embed button, which looks like a pair of angle brackets. Then, copy the embed code and paste it to your website.
How Do I Embed a Specific View?
Sometimes you have to embed particular database elements, instead of a full database. To do that, create a view for sharing. Select the share button, which looks like a square with an Arrow (found in the view bar.) Select the “Create a shareable grid view link”, then “Embed this View on your site”. Repeat the preview actions, copy the link and paste it to your site.
How Do I Customize a Base in Airtable?
The platform offers a lot of base editing options. To change the color and icon of your base, select the dropdown arrow for the icon of the base you are going to change. A color menu should appear. Simply pick a color – it will change automatically. This menu also allows you to rename the base and duplicate it. To set an emoji as a base icon, insert an emoji at the beginning of the base title.
How Do I Add a Workspace Collaborator by Email?
Airtable is all about teamwork. To add a member who will be able to access your bases via the permissions you set, follow these steps:
To send an invite by email, click the “Share” button in the top right corner of the main menu. Type the email address in the window underneath the “Invite by email” sign. Then, click “Send invite”. The member will have access to all your bases.
To set the permission level, you have to add a member as a specific base collaborator. First, find the required base in the main menu. Then, click on the dropdown arrow beside the base icon and select “Share”. Type the email address in the window underneath the “Invite by email” sign. Add more members by separating “email” with a comma.
The dropdown menu on the right from the email address window allows setting one of four permission levels. The Owner permission level grants full access to all functions. The Editor and Commenter levels have about half the permission number, and the Read-only option only allows views of the base.
How Do I Add a Collaborator by Link?
If an email invite doesn’t work out for you, Airtable has an invite by link option. Open the “Share” menu beside a base icon. Select the “Invite by link” option and set the permission level. By default, the link will grant access to anyone who follows it.
You can change settings so that access will be granted only to people with an email address with a specific domain. To do that, select the “Only allow … email addresses” option and type in the domain name. Then, click the “Create link” button, and click on the clipboard icon to copy the link.
Efficient Communications
Now that you’ve learned how to add, edit and link bases and manage your schedules in Airtable, your working processes should have become more convenient and effective. The platform is worth spending even more time on as it has an impressive number of other features.
Have you ever linked tables in Airtable? Was it a straightforward process? Let us know in the comments section below.


0 comments:
Post a Comment