Adding a webcam to Open Broadcaster Software (OBS) is one of the first things most users learn about the program. It’s a very straightforward process, thanks to the streamlined UI. Additionally, you can integrate the webcam mic if you lack the proper audio equipment.
Below you’ll find a step-by-step breakdown of how to add a webcam to OBS. We also included some tips on adjusting the settings to improve the image quality and what to do if your webcam isn’t responding.
How To Add a New Webcam to OBS
OBS allows you to connect any video device you have at your disposal, from camcorders to webcams. However, most streamers use the integrated cameras on their computers for broadcasting. In the following sections, we’ll explain how to add a webcam to OBS with step-by-step instructions. Furthermore, we’ll show you how to adjust the audio settings if you want to integrate the webcam mic.
Video Capture Device Input
With the “Video Capture Device” feature, you can broadcast any video driver from your operating system. Of course, that includes your webcam. Here’s how to get started with the integration:
- Launch OBS and navigate to the “Sources” box at the bottom of the window.

- Click on the tiny plus button to access a pop-up panel.
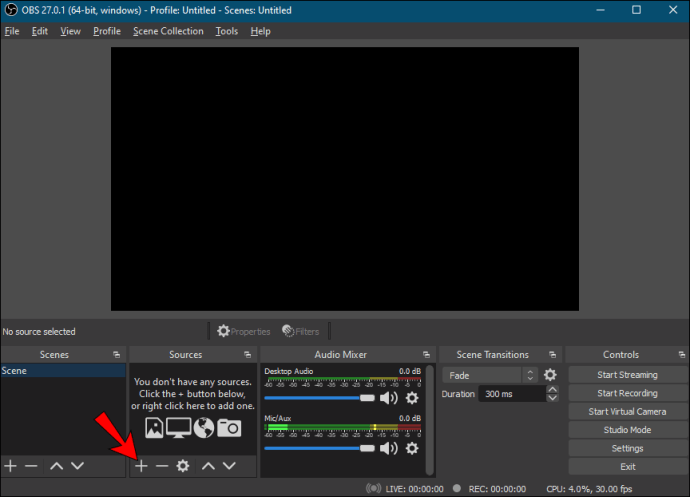
- Finally, from the list of options, choose “Video Capture Device.”

Naming the Layer
Next, you want to label the webcam layer for better navigation. It’s especially important if you plan on adding more than one video device. Here’s how to do it:
- Once you’ve selected the Video Capture Device, a small pop-up window will appear.

- Mark the circle next to “Create New Source.” In the dialog box below, enter the name of the layer. For example, “Webcam 1.”

- If you want to add an existing layer to the broadcast, select the circle below. Next, choose the layer from the provided list.

- Lastly, make sure to check the tiny box marked “Make the Source Visible”; otherwise, you won’t be able to locate it. Once you’re done, click “OK.”

Selecting the Device
If you have multiple webcams, you have to select the one you want to be your Video Capture Device. Here’s what you need to do:
- After naming the layer, a new “Properties” window will appear.

- Click on the “Devices” dialog box to open a drop-down list of devices. Next, choose your webcam.

- If you notice something off about the image, you can tweak the webcam settings. Click on the “Configure Video” button below to access the settings. Then configure the camera properties by moving the sliders. Once you’re done, click “Apply” then “OK.”
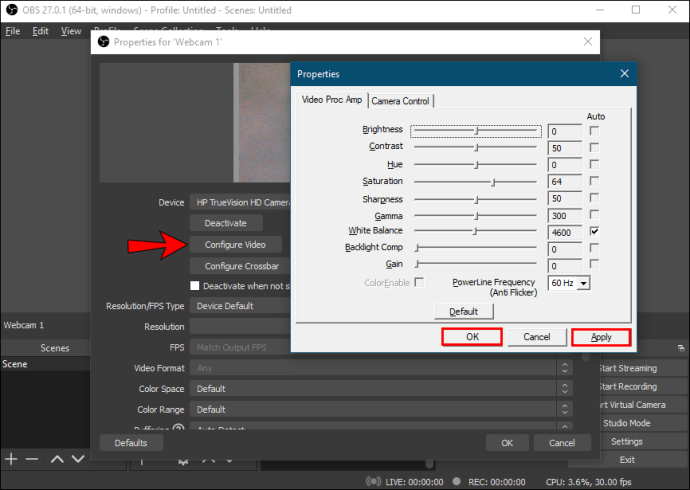
- If you want to change the default resolution, click on the “Resolution/FPS Type” dialog box. Select the preferred setting from the drop-down list.

- Finally, click “OK” when you’re done.

Adding the Webcam Microphone
The webcam microphone is not automatically added as the audio source, so you’ll have to do it manually. Luckily, it’s nothing too complicated, and you can do it via “Settings.” Just follow the instructions below to select your webcam audio as the primary source.
Select the Webcam Under the Audio Tab
Here are the steps:
- Click on “Settings” in the bottom-right corner of the OBS window.
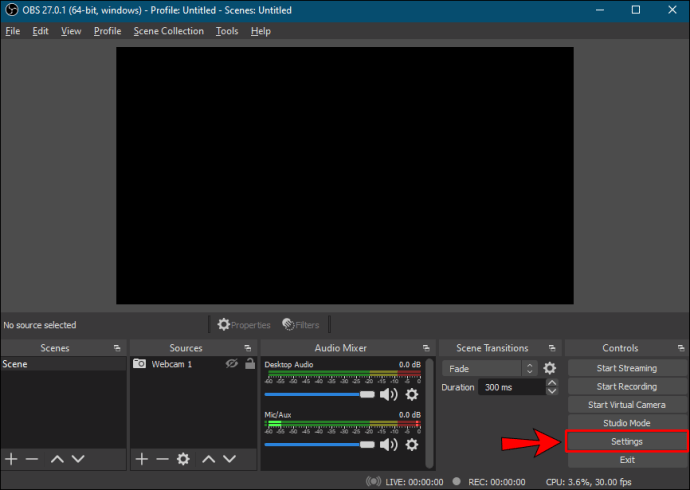
- A new window will appear. From the panel on the left-hand side, click on the “Audio” tab.
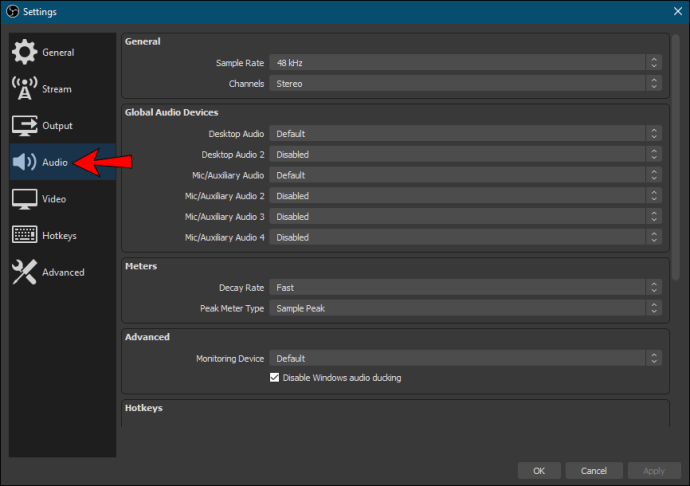
- Next, click on the “Mic/Auxiliary Audio Device” dialog box to access a drop-down list.
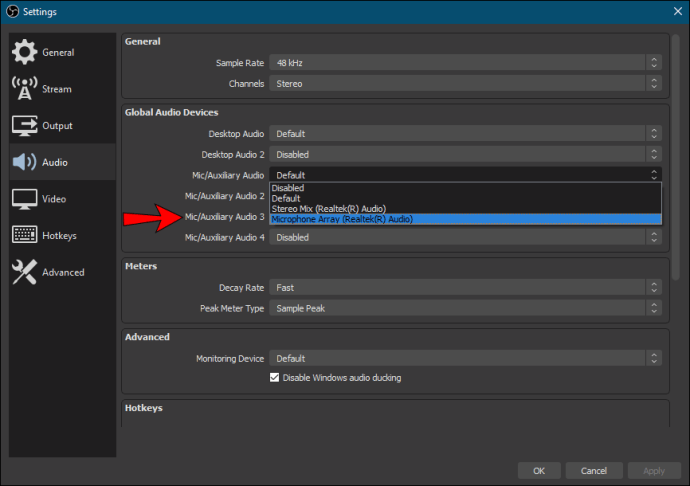
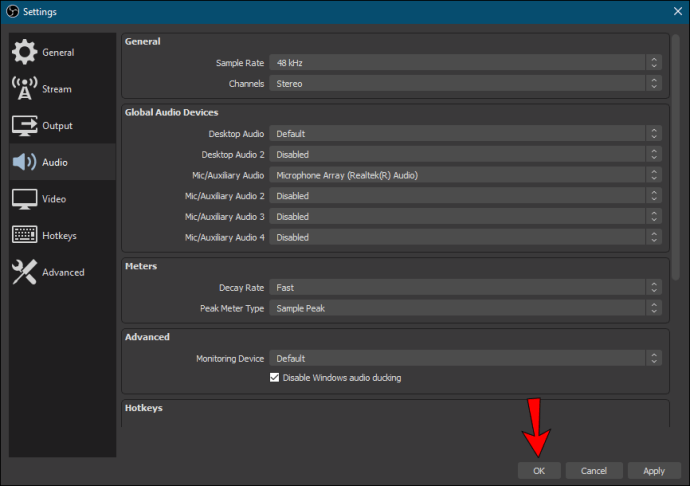
- Select your webcam as the audio source and click “OK.”
- If you want to adjust the volume level, scroll to the “Audio Mixer” box. Move the slider to the left or right, depending on whether you want it to be lower or higher.

Additional FAQs
What are optimal webcam settings for OBS?
If you’re not happy with the image quality, you can always readjust the webcam settings for a better result. While the default configuration of your video device can typically do the trick, many factors can hinder the image quality. For example, the lighting in your room may be too dark for the default exposure on your webcam.
Whatever the reason, there’s a possible fix. So, here’s how to adjust the webcam settings for a better broadcasting experience:
1. Navigate to the “Sources” box and double-click on your webcam to access the settings.
2. If you haven’t already, change the resolution and FPS to a custom setting. Click on the “Resolution/FPS Type” dialog box and choose a preferred resolution and frame rate.
3. Next, click on “Configure Video.” The “Settings” window will appear.
4. If the issue is low brightness, move the “Brightness” slider to the right to increase the level.
5. If the image is still too dark, try increasing the exposure. In contrast, if it’s borderline translucent, you need to bring it down by moving the slider to the left.
6. If you want the image to appear “warmer,” you need to fix the color temperature. Move the slider marked “White Balance” to the right for warmer hues and to the left if you want the image to be “cooler.”
7. If the image appears “grainy,” your webcam is probably struggling with the lighting. Try toggling the “Gain” feature to fix the problem.
Why is my webcam not working with OBS?
Sometimes, there can be issues with the webcam integration. Usually, it’s nothing too serious and can be managed with a simple reboot. There are also some more advanced troubleshooting measures you can try if the quick fixes don’t work.
If your webcam is not responding, try closing and then re-launching OBS. And if that doesn’t work, you might need to update the software. Outdated firmware can sometimes lead to glitching, so downloading the new version of OBS might help. Here’s how to do it:
1. Open your browser and go to the official OBS website.
2. Click on the “Download” tab at the top of the page.
3. Next, select the appropriate version for your OS. There are three editions available for Windows, Linux, and Mac.
4. Finally, follow the on-screen instructions to complete the download.
Another possible root of the problem could be background apps. If programs such as Skype or Zoom are currently using the webcam, then OBS won’t add it as a video device. Make sure you close all background apps when adding your webcam and restart the broadcasting software.
If you’ve tried all these quick fixes and the webcam is still not responding, it’s time to move on to more advanced measures. For example, if you have multiple “Scenes” in OBS, you’ll have to enable a particular webcam setting for each one manually. Here’s what you need to do:
1. Scroll down to the “Scenes” and click on the first one.
2. Next, double-click on the webcam in the “Sources” box to access “Settings.”
3. Check the box marked “Deactivate When Not Showing.”
4. Repeat the same steps for every Scene and Source you have in OBS.
Finally, OBS support recommends reinstalling the webcam as an effective troubleshooting measure. It may boost the video driver performance, which will, in turn, facilitate the OBS integration. Here’s how to do it:
1. Launch the “Device Manager” app on your computer.
2. Locate your webcam on the list of available devices. Right-click to open a drop-down panel and choose “Uninstall.”
3. If you just want to update the video drivers, click on “Update Driver” instead.
4. Once you’ve disconnected the camera, wait a few minutes before you reconnect it.
5. Finally, restart your computer.
Smile for the Camera
OBS lets you add any video device that’s currently available on your operating system, including the built-in computer camera. You can integrate your webcam in a few simple steps. In addition, you can use the camera mic as the primary audio source.
If there are any issues with the image quality, OBS allows you to tweak the settings for the optimal result. And in case of any glitches or bugs, there are several possible fixes you can try. It’s always best to start with the basics, like rebooting the software, and if that doesn’t work, move on to more advanced troubleshooting.
Do you use OBS for live broadcasting, or is there a different software you prefer? Do you know any other possible fixes for webcam glitches? Let us know if we’ve missed something in the comment section below.
Original page link
Best Cool Tech Gadgets
Top favorite technology gadgets


0 comments:
Post a Comment