If you got to know Valorant through the closed beta release, you’ve probably gotten used to some limitations with the game’s settings.

It wasn’t possible to change your in-game language from the game menu in the closed beta. This confused many players since they couldn’t find a way to switch from the default English to another language.
There was a workaround for the problem, but it was equally confusing. Players had to do things like disabling the automatic login and changing the game’s shortcut parameters.
All of that’s changed, though, with the full release of the game. Discover a simpler way to change voice and text language in Valorant and get on with your matches.
How to Change Voice Language in Valorant
In the full release version of Valorant, it’s relatively straightforward to change the voice language from the in-game main menu. Take a look at these steps to get started:
- Enter the settings menu, available on the bottom left side of the screen.

- Choose your preferred language from the Game Language drop-down menu.

- Exit out of the menu.
Once you make the change, exit and relaunch the game to let it download the language pack.
How to Change the Language in Valorant
Changing the voice language in Valorant also changes the text language. If you’d like to have the audio and text in different languages, there’s a workaround you can use.
Please note that this workaround involves modifying the game files, which can get your account banned. While there’s nothing inherently wrong with this modification, such changes are automatically detected. The algorithm doesn’t differentiate between benevolent modifications and those that can be used to make the competitive game environment unfair.
Part 1 – Creating the Language Pack
- Locate the text files for the language you’d like to see. These files are in the game file directory.
- The path should look like this:
Riot Games\VALORANT\live\ShooterGame\Content\Paks

- The two files you’re looking for will be a .SIG and a .PAK file with the name en_US_Text-WindowsClient. Copy the .SIG and .PAK files together.
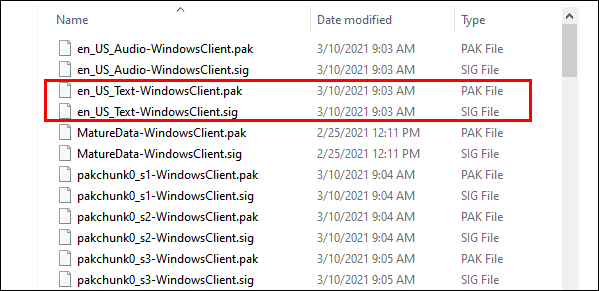
- Create a new folder anywhere on your computer and paste the two files there.

- Launch Valorant and change the language to your preferred audio language as previously described.

- Reopen the game launcher and let it download the new language pack.

- Open the directory from the first step and refresh it.

- Find the new .SIG and .PAK files.
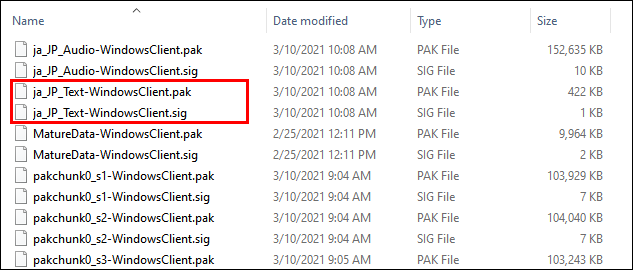
- Open the folder where you copied the previous two files and rename them the same as the two new files from the game directory.
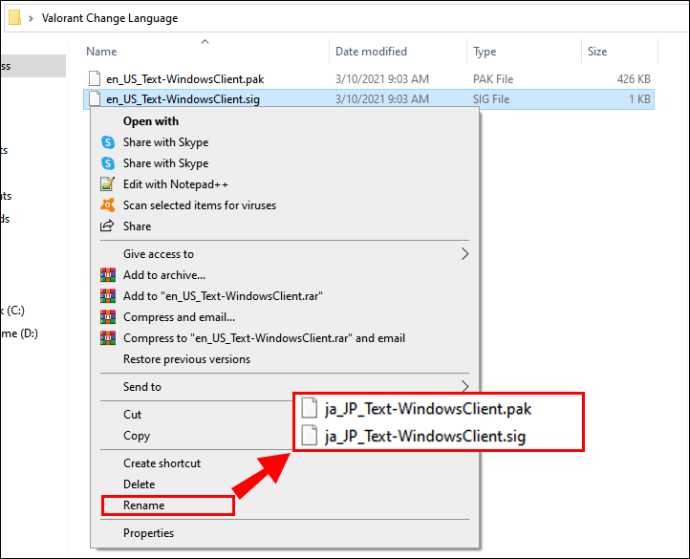
For the files mentioned in step 2, you’ll only need to replace the en_US prefix of the file names with the appropriate language abbreviation for your chosen language. The rest of the file names should remain the same.
Part 2 – Creating the Launcher
Since the launcher will automatically restore the language files whenever it starts, copying the renamed files back to the game directory won’t be enough. Instead, you’ll need to create a script for launching the game.
- To start making the script, create a new Notepad text document. Copy and paste or enter the following commands exactly as written below:
@echo offstart "" "your Valorant launcher shortcut path"timeout 6copy /y "your preferred text language files location\*.*" "your Valorant game directory" - Replace the “your Valorant launcher shortcut path” line with the actual path. The default shortcut path should be
C:\ProgramData\Microsoft\Windows\Start Menu\Programs\Riot Games\VALORANT.lnk.
Make sure to replace only the words and leave the quotation marks.

- Replace “your preferred text language files location” with the directory path of the files you’ve copied and renamed in steps 3 and 9 in Part 1 “Creating Your Language Pack.”
If you’ve copied them to a new folder on your desktop, the path should look something like C:\Users\YourName\Desktop\New Folder. Make sure the line in the text file ends with \*.* and, again, leave the quotation marks untouched.
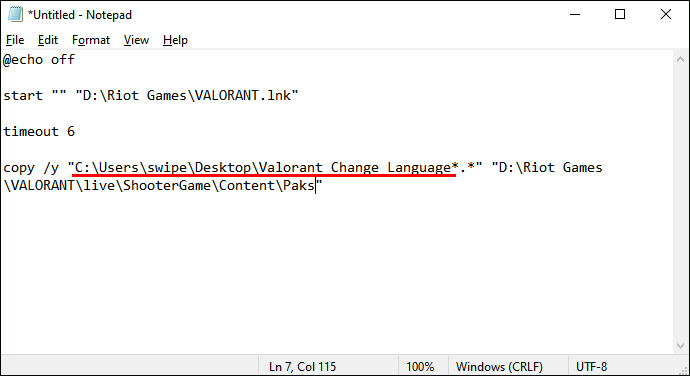
- There’s only one line of text left to replace, and that is “your Valorant game directory”. Replace it with the path from step 3. The path should look something like this:
…\Riot Games\VALORANT\live\ShooterGame\Content\Paks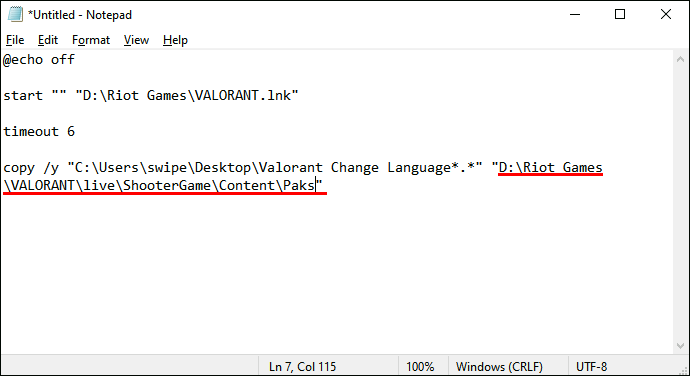
Your final Notepad document should look like this (with your own paths included instead):@echo offstart ** C:\ProgramData\Microsoft\Windows\Start Menu\Programs\Riot Games\VALORANT.lnk
timeout 6
copy/y “C:\Users\lyjif\Desktop\English Text\*.*” E:\GAMES\Riot Games\VALORANT\live\ShooterGame\Content\Paks
- Once you’ve edited the text appropriately in Notepad, go to File, then click on Save As. Rename the file and save it as a .BAT extension.
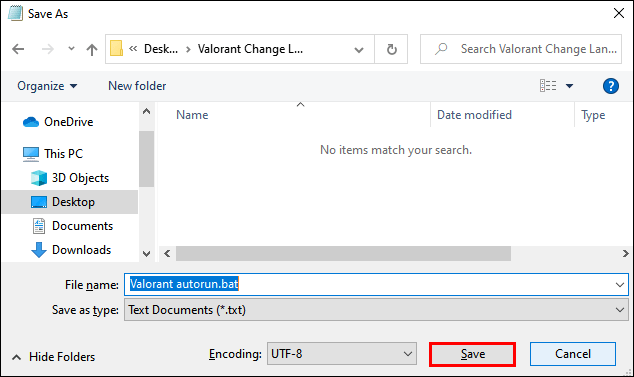
- Ensure the Valorant launcher is closed and run the game from your new .BAT file.
This method should allow you to run Valorant with one language for voice and a different text language. The crucial point is to always launch the game from the .BAT file rather than from the launcher.
Changing the Language In-Client
The method for changing the language in Valorant we mentioned refers to making the change in-client. Here’s a quick rehash of it:
- Start the Valorant launcher. You should see the sign-in boxes on the left, and the game artwork on the right.

- Click on the gear icon in the bottom right corner.
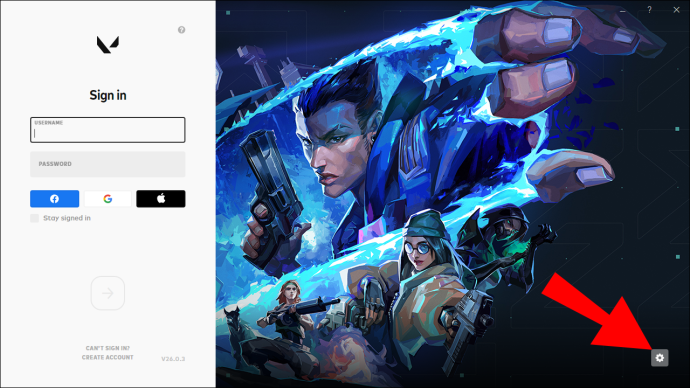
- There’ll be two menus – Current Patchline and Game Language. Click on Game Language to show the drop-down menu.

- Choose the preferred language by clicking on it.
- Exit and restart the launcher.
Changing the Language In-Game
If you want to change the language when you’re already in the game, the process is relatively straightforward.
- In the top left corner, click the stylized V icon. You’ll recognize it because it’s the first one on the left and the V is boxed.
- You’ll see a drop-down menu with items like Settings, Support, and About. Click on Settings.

- This opens the Settings window with five tabs at the top. Make sure you’re positioned at the General tab.

- The first option on the left side is Text Language. Click on it to open the drop-down menu and select the language you want.

- As with the in-client change, you’ll need to restart the game before the change takes effect.
Additional FAQs
1. How Do I Change the Voices in Valorant?
A great way to change your character’s voice in Valorant is through mods. There’s a mod called Voicemod made to do just that.
The mod’s free, and it changes the character’s voice in real-time, while also supporting soundboards. The voice modulator can be activated using a keyboard shortcut for real-time control.
The best part of this mod is that you can use the included presets or create a custom voice. To install the mod, you’ll need to follow these steps:
• Download and install the mod.
• Open the app and configure it to your liking.
• Make sure to select the mod’s virtual audio device as the input device.
Once you save the settings, you’ll be able to change your Agents’ voices in Valorant.
2. How Do I Change My Valorant Name?
You can change your Valorant name once a month. It’s important to remember you can’t do this more often and you should be completely satisfied with your new name before changing, as you’ll be stuck with it for the next 30 days.
The name change is done through your Riot ID, which is a combination of your screen name and the short hashtag. While everyone can see the name, the hashtag is useful for adding new friends in Valorant.
Here’s how to change your name through Riot ID:
• To change your Valorant name, log in to your Riot account. Bear in mind you might need to reply to a verification email before proceeding.
• When you’ve successfully logged in, you’ll see the window with your account options. You’ll see a variety of settings on the left side of the screen. Click on Riot ID.
• The next screen shows your Valorant screen name and hashtag. Click on the pencil icon next to your name to edit your Riot ID.
• Enter your new name or hashtag. Make sure not to use the word Riot or any inappropriate terms in your new name, as such changes won’t be tolerated.
• If you’d also like to change the hashtag, you can devise any combination of numbers and letters, as long as it’s three to five characters long. Alternatively, use the Randomize option to get a generated hashtag.
3. How Do I Change the Language in Valorant?
If you’ve followed the previously stated advice from this article, by now, you should have a clear idea of how to change the language in Valorant.
As a quick recap, you can change the language from an appropriate menu either in-client or in-game. Further, you can even set up your game so that different languages are spoken and displayed, although this might be risky.
Make Valorant Sound Just How You Like It
With the available options, it’s apparent that changing the language in Valorant is a rather simple matter. Now that you know exactly how to do it, you be able to effectively communicate with your team, coordinate your actions, and, of course, taunt your enemies. Once you configure the game language according to your needs, the road to communication is wide open.
Have you been able to change the language in Valorant? Please share your experiences with us in the comments section below.


0 comments:
Post a Comment