Anyone who works in a team knows that collaboration is a critical element of contemporary business practices. Communicating and exchanging information with your coworkers is the recipe for productivity. However, sometimes a particular task requires outside expertise, which can hinder the workflow. That’s when platforms like ClickUp can come in handy.

In this article, we’ll show you how to add guests to your ClickUp Workspace and cover all the sharing and management options.
How to Add Guests in ClickUp?
With every subscription plan, you unlock a certain number of guest seats. The feature is ideal for collaborating with consultants who only require access to a particular task in your Workspace. These users have limited access to the data, so they won’t be able to view anything you haven’t expressly shared with them. You can also recognize guests by the tiny orange square on their profile pic or avatar to avoid confusion.
Learning how to add guests in ClickUp is a breeze, thanks to the elegant layout of the platform. Not only is the process pretty straightforward, but you can also do it with different operating systems. There’s a desktop app available for both Mac and Windows PC and a mobile version for iOS and Android. However, not all installments have the same features, so make sure to keep reading for more details.
On Mac
The desktop app is great if you need to work offline. It does have fewer features than the web version since the latter is updated more frequently. However, you can easily manage the basics tasks, and that includes adding guests to a particular Workspace feature. Here’s how to do it:
- Launch the ClickUp app with Finder or Launchpad.

- Find the task, folder, or list you want to share with the guest user.

- Click on the three dots on the right-hand side to open the actions menu.

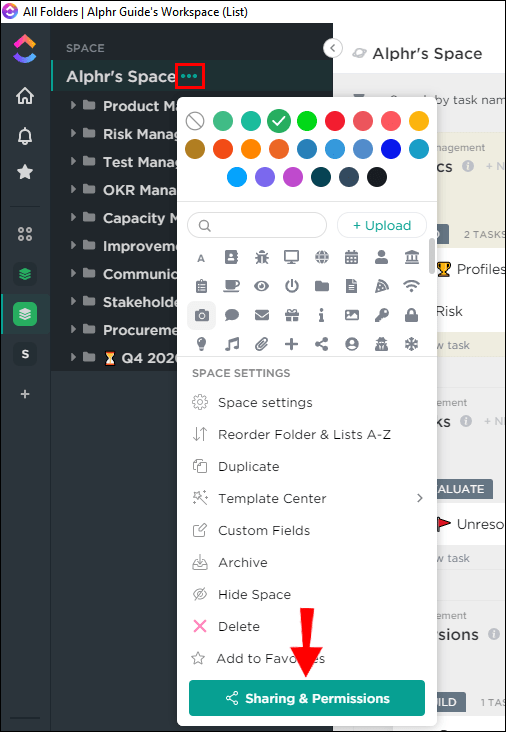
- Select “Sharing and Permissions” from the list of options.

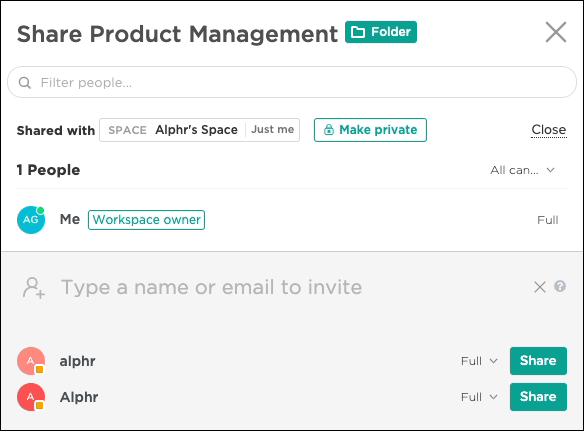
- A pop-up will appear. Type the guest’s email address in the dialog box to send an invite.

- Choose the preferred permission. You have several options: view, comment-only, edit, and create.
On Windows 10
Pretty much the same steps apply for the Windows 10 version:
- Launch the app by double-clicking on the desktop icon.

- To share a list with a guest user, click on the ellipsis next to the title on the right-hand side. Click “Sharing and Permissions” and type the appropriate email address.

- To add guests to a whole folder, find it in your dashboard. Open the actions menu and go to “Sharing and Permissions.” Send the invite and set the desired permission.

- To add a guest to an entire task, click to open it first. At the top of the page, click on the three horizontal dots. From there, share the folder by sending an invite to a guest user.
Note: There’s also a Chrome extension available in the Chrome Web Store. Apart from the standard operations, you can use it to attach emails to ClickUp tasks. It works with both Gmail and Outlook.
On Android
At first, the ClickUp mobile app was met with harsh reviews. Users complained it was lackluster compared to the desktop counterpart, not to mention the cloud-based version. However, the latest upgrades brought significant improvement, especially when it comes to the response time.
The new and improved version for Android devices can be found on the Google Play Store. It’s available for free and works great if you need to check your Workspace while on the go.
After you’ve logged in, you can access all your files, folders, lists, and spaces with your phone.
Unfortunately, you can’t actually use it to add members or guests to your Workspace features. As of now, it only serves to communicate with your team members and keep track of the workflow. Hopefully, future updates will incorporate more advanced features, but for now – stick to the desktop versions.
On iPhone
There’s an iOS version of the app available in the App Store. You can get it for free and stay on top of things while you’re away from your computer.
Much like the Android version, you can’t invite guests to your Workspace features with your phone. However, that doesn’t render the mobile app completely useless. You’ll still be able to communicate with your coworkers and even create new tasks. It can really come in handy if you’re on the move but still have to check in with your team.
How to Manage Guests on ClickUp?
As the Admin, you can manage all members of a particular Workspace (guest users included) by using the ‘’People’’ page on the admin dashboard. You can change the guest’s permission settings, upgrade them to a member, or even remove them from the feature entirely.
On Mac
If you want your guests to have access to completed tasks, you can change their user status. Once they’re made members, they can go over their previous work even if they’re not actively involved with the Workspace anymore. Here’s how to do it:
- Open the Admin menu by clicking on your avatar.
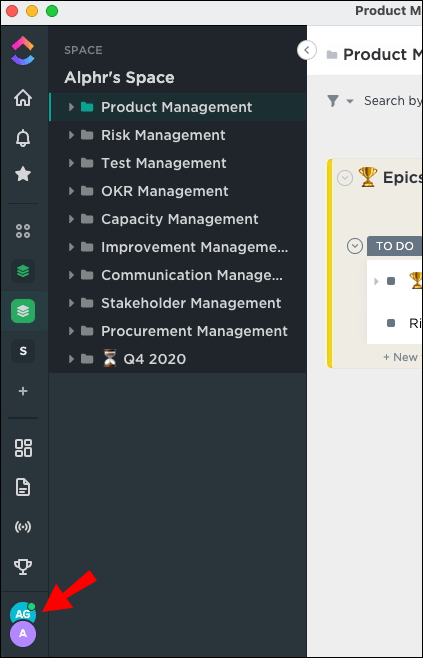
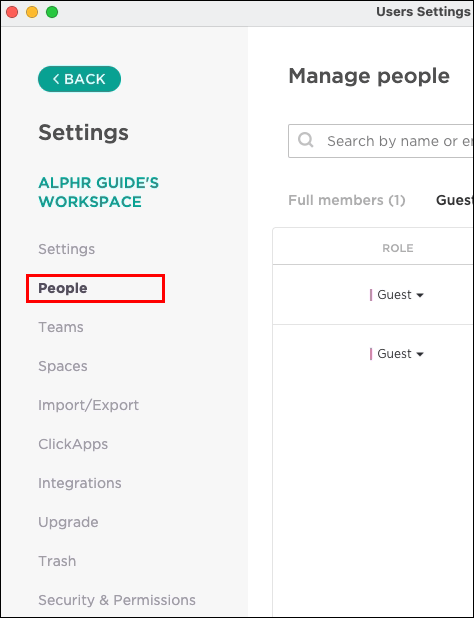
- Select “People” from the list of options.

- Find the user you want to manage. Either scroll through the guest list or use the search function at the top of the window.
- From the bar on the left-hand side, click on the downward arrow next to “Guest.” Select a new role from the drop-down list.

You can also remove guest users entirely once they’ve finished what they’ve set out to do:
- Go to Admin menu > People page.
- Find the user on the guest list.
- Click on the three horizontal dots on the far-right side of the screen.
- Select “Remove” from the list of options.

On Windows 10
When adding guests to a particular task, you usually set the permission setting right off the bat. Of course, sometimes, their level of involvement changes as the project continues. You may need them to participate more actively by leaving comments or editing the files. Luckily, ClickUp allows you to change the level of clearance at any given point. Here’s how to do it:
- Open the admin menu by clicking on your avatar.
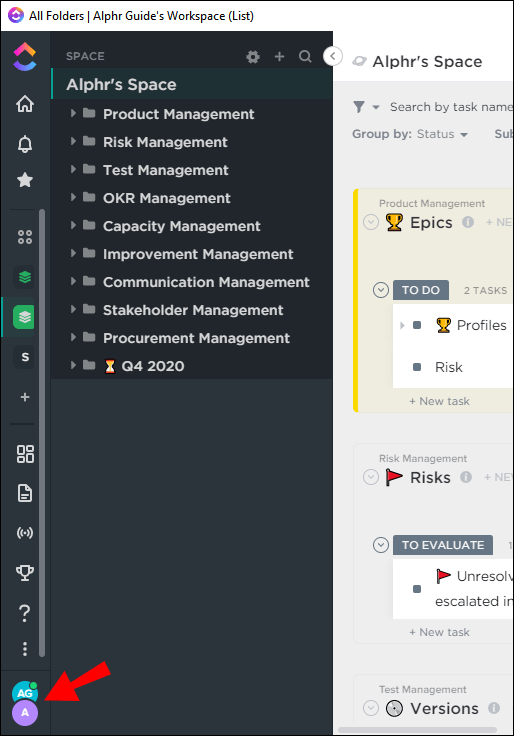
- Click on the “People” category and locate the guest on your list.

- Under “Access,” click on the desired folder, list, or task.
- A small pop-up will appear. Click on the current permission setting in the lower-right corner.
- Select a new setting from the drop-down list.

There’s another way to determine which features will appear in guest view. If you want to grant someone more access but don’t want them to view everything, you can use your Admin privileges to hide it. For example, features like Time Tracking, Time Estimates, Custom Fields, and Tags can all be concealed from guest users, if you so choose. Here’s what you need to do:
- Open the People page in the Admin menu and locate the guest.
- Under “Permissions” on the far-right side of the screen, you’ll see the features. Click on the corresponding symbol to hide or show a particular feature.

On Android (and iPhone)
As mentioned, the mobile versions are limited when it comes to managing guests and members. However, there are other actions you can take that make the app worthwhile:
- Create new tasks
- Update and edit tasks
- Collaborate with your coworkers and members of staff
- View your to-do list
- Stay in the loop via push notifications
Additional FAQs
Can Guests Edit Spaces, Folders, or Task Lists?
Yes, if you grant them permission. Guests can only do what you allow them to do, which can ensure one of the following:
• View – they can look at the shared data.
• Comment – they can add feedback or input, but they can’t edit.
• Create and edit – they can create new folders, insert new data, or make changes to existing features.
However, to access the full range of permissions, you have to be signed up for a paid plan. Also, guests can only be invited to individual Workspace features, such as lists, folders, or tasks. You can’t add them to the entire Workspace unless they’re upgraded to member status.
What Happens When I Run Out of Guest Seats?
Each paid plan has a number of guest seats available:
• Unlimited Plan: five guest seats per member, and two more with every additional Workspace member.
• Business Plan: 10 guest seats per member, and you get five more for every added Space member.
• Enterprise Plan: Same number of guests as the Business Plan, with some extra Admin options. For example, you can determine who has the authority to invite guests or ban the feature altogether.
Simply put, each time you add a new member to your Workspace, ClickUp grants you another guest seat. Keep in mind the scheme concerns permission-available users only. The platform allows you to add an unlimited number of view-only guests regardless of the plan.
Be Our Guest
Workspace Admins can add guests to individual lists, tasks, and folders with just a few simple steps. Since ClickUp is a pretty straightforward collaboration tool, you don’t have to be well-versed to find your way around it. Also, with the appropriate subscription plan, you get to decide the access level for each user.
If working offline keeps you more focused, you can download the desktop version for both macOS and Windows 10. The apps let you manage your guest list with ease since the interface is almost identical to the cloud version. ClickUp mobile, however, is slightly more restrictive but can still come in handy.
Do you use ClickUp for project management? What are your experiences with the tool? Comment below and tell us if there is, in fact, a way to add guests with your mobile phone.
Original page link
Best Cool Tech Gadgets
Top favorite technology gadgets


0 comments:
Post a Comment