One of the most important aspects of participating in video meetings is the ability to share your content with your colleagues. While sharing images and documents is relatively easy, sharing video content can be tricky. The resolution of the video might not always be clear, and your colleagues might not be able to hear your video at all. That’s why you should consider using Webex.

Webex is a fantastic web conferencing platform that allows you to share your video content at a high frame rate, allowing other participants to see and hear the audio clearly. In this guide, we will show you how to share your video with sound in Webex across different devices.
How to Share Video With Sound in Webex on a Windows 10 PC?
If you are familiar with Webex, then you already know that you can use the desktop app or the web app. Although the desktop app provides many more features, you can participate in video meetings on the web app as well. However, since downloading the desktop app only takes a couple of minutes, we highly recommend doing it, as you will come across several limitations on the web app.
In any case, we will show you how to share videos with sound on both versions of this platform. What’s more, the process of sharing content on the web app and the desktop app is relatively similar.
To share your video file with sound in Webex on Windows 10 using the desktop app, follow the steps below:
- Open Webex on your desktop.

- Start a meeting or join an ongoing one.

- Click on the share icon at the bottom of your screen. A new “Share content” tab will pop up.

- Go to the “Optimize for text and images” box, which is set by default.
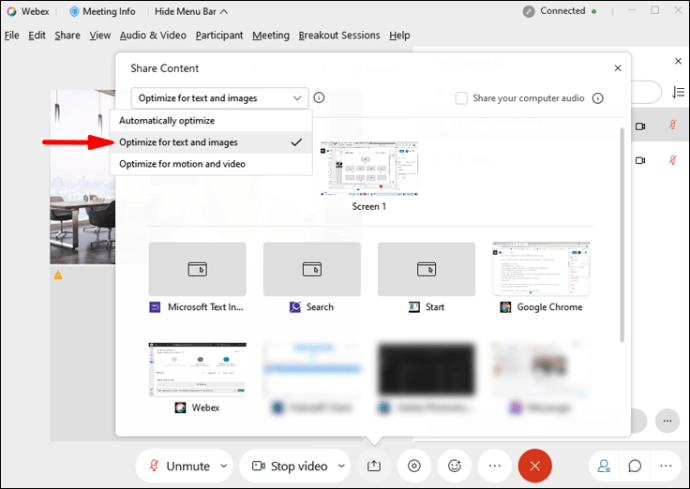
- Select “Optimize for motion and video.”

- Tick the “Share your computer audio” box in the bottom-right corner of your screen. If you skip this step, then other participants won’t be able to hear the video.

- Go to the screen or app that contains the video that you want to share.

- Play the video.
That’s about it. Webex allows all the participants of the meeting to hear the video clearly, no matter what device they are using to participate in the meeting at that moment.
To share video with sound in Webex on the web app, follow the steps below:
- Go to Webex and join a meeting. You can do this by clicking on the invite link that you received in your email.

- Go to the “Share content” icon at the bottom of the screen.

- Choose “Optimize for motion and video.”

- A new tap will appear. The web app lets you choose between “Screen” and “Application.” Click on “Screen.”

- Make sure the “Share your computer audio” box is checked, or no one will be able to hear your video.
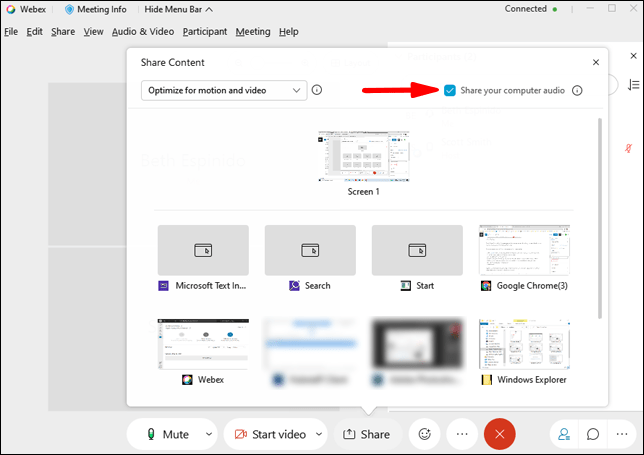
- Choose “Your entire screen” or “Chrome tab.”
- Play the video.
Note: The option to optimize for text, images, motion, and video is only available on Google Chrome so far. This feature isn’t possible on other ISPs at the time of this writing.
Keep in mind that the Webex web app looks the same on all devices. So, no matter which OS you have, sharing your video with sound on the Webex web app consists of identical steps.
How to Share Video With Sound in Webex on a Mac?
Sharing video content with audio in Webex on your Mac is similar to how you would do it on Windows 10, but it requires a couple of more steps. Here’s how it’s done:
- Open Webex on your Mac.

- Start a new meeting or join one.

- Select the share icon at the bottom of your screen.

Note: If you are sharing video content for the first time, you will need to install audio drivers. - The “Install audio drivers” tab will pop up. Click “Install.”

- Follow the on-screen instructions.
- Click on “Share” on the top banner.
- Go to “Share content.”

- Choose “Optimize for motion and video.”
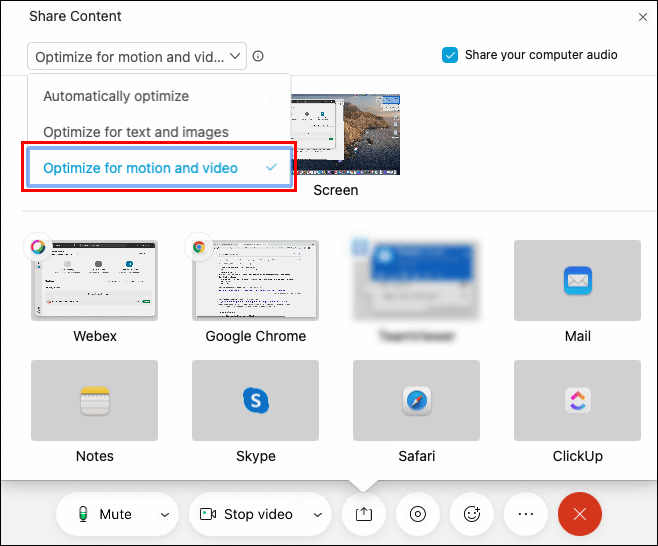
- Make sure the “Share your computer audio” box is checked.

- Navigate to the screen where your video is.
- Click on “Share.”

- Press play.
That’s all there is to it. Once your video finishes playing, click on “Stop Sharing” on the floating bar at the top of your screen. The next time you want to share your video content on your Mac, you will be taken to the “Share content” tab directly.
How to Share Video With Sound in Webex on a Chromebook?
If you want to share a video file with audio in Webex on a Chromebook, follow the steps below:
- Open the Webex desktop app on your Chromebook.

- Start a new meeting or join one that is already in process.
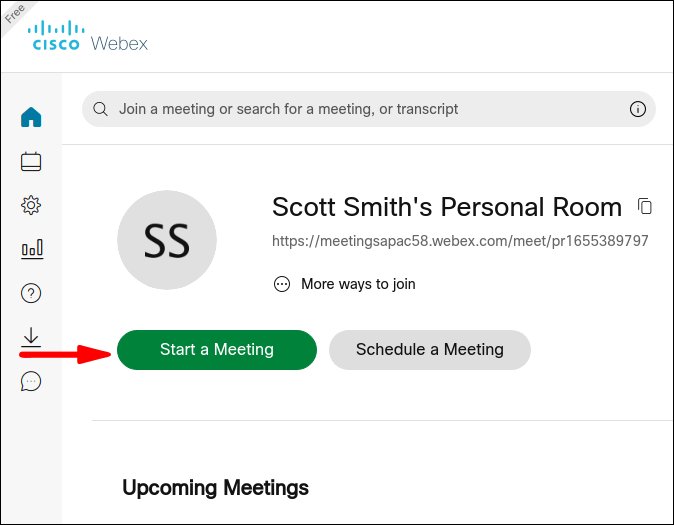
- Hover your cursor over the screen to reveal the toolbar at the bottom of your screen.
- Choose the share icon from the toolbar.
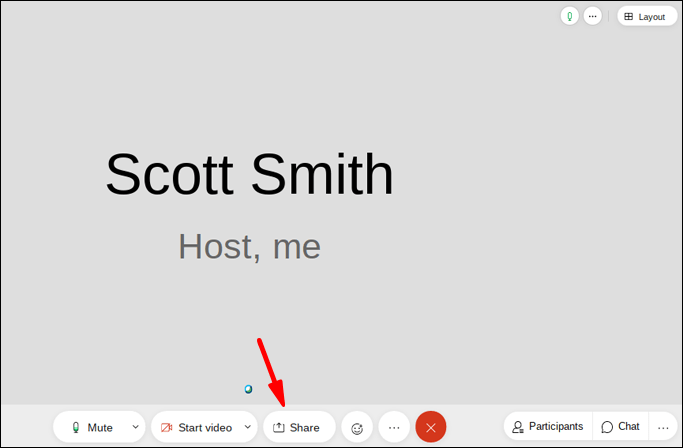
- Go to “Optimize for text and images,” which is set by default.

- Click on the tab, and choose “Optimize for motion and video.”
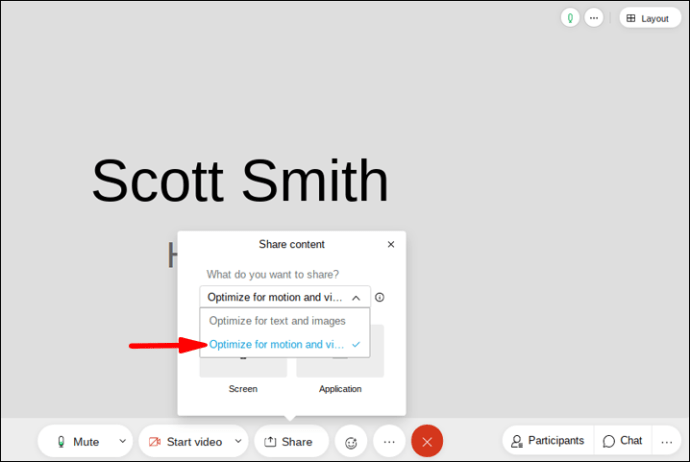
- Tick the “Share your computer audio” box in the bottom-right corner of your tab.

- Choose the screen where your audio is.

- Click on the video and press play.

To make sure everything goes smoothly, prepare the video before the meeting starts. When it’s time to share it, you will know exactly where it is. This step can be very handy if you have a lot of tabs and apps open. Just remember, when you share your screen, your colleagues can see everything it contains.
How to Share Video With Sound in Webex on Linux?
Sharing your video content with audio in Webex on Linux is also possible. Here’s how you can do it:
- Open the Webex desktop app.
- Either start a new meeting or join one.
- Hover your cursor over the screen for the toolbar to appear.
- Go to “Share content.”
- A new tab will pop up. Click on the “Optimize for text and images” tab.
- Select “Optimize for motion and video” from the menu.
- Click on the “Share your computer audio” box in the bottom-right corner of your screen.
- Choose the screen or app where your video is.
- Enter the video and press play.
That’s all there is to it. When your video finishes playing and you don’t want to share any more content, simply go to the “Stop Sharing” bar at the top of your screen, and you can continue your meeting.
If you have multiple videos to share, but they are located within different screens, go to the “Share content” icon to switch between screens. The fewer tabs you have open at this point, the better. Too many open pages and tabs can confuse both you and your colleagues.
Additional FAQ
Does Webex Offer This Functionality on the iPhone or Android?
Webex is also available for mobile devices, and you can share your screen with both iPhone and Android devices. Unfortunately, sharing video and audio files still isn’t possible on the mobile app.
On the other hand, you can share plain text, Microsoft Office documents, Apple iWorks documents, PDF files, images, ZIP files, and many more. The option to share .mp4 files might become possible in the future.
Apart from standard video chat features, some other things you can do on the Webex mobile app include muting participants, changing your video connection options, changing your background, searching for participants, changing participant roles, recording meetings, and many more options.
Make Webex Video Meetings More Interesting With Video Content
Now you know how to share video content with sound in Webex across different devices, on both the desktop app and the web app. You also know how to stop sharing content, and how to switch between different screens and apps to ensure the meeting flows smoothly. Learning how to share video content in Webex is only the first step, there are countless other handy things you can do on this video conferencing platform.
Have you ever shared a video with sound in Webex? Did you use any of the methods outlined in this article? Let us know in the comments section below.
Original page link
Best Cool Tech Gadgets
Top favorite technology gadgets


0 comments:
Post a Comment