Is your mic picking up any annoying background noise? Besides being irritating, background noise can cause you to lose your focus and ultimately affect the sound quality. While every recording generates some extent of background noise, there are ways you can minimize this and improve your experience.

Different things can cause background noise. Although it is inevitable, you can take action and keep it to a minimum by following simple steps and guidelines.
Types of Unwanted Sounds
Before trying to minimize the unwanted noise, we should first try to understand it better. Several types of background noise can affect the sound quality and interrupt your recording:
- Impulse noise – sharp sounds involving pops and clicks are called impulse noise. These sounds are usually short and high in frequency.
- Broadband noise – continuous sounds involving a wide range of frequencies are called broadband noise. Buzzing and hissing belong to this category.
- Narrow band noise – continuous sounds involving a narrow range of frequencies are called narrow band noise. These sounds remain steady and are usually caused by improper grounding or cables connected to the mic.
- Irregular noise – unwanted sounds such as traffic, rain, thunder, speech, etc. Since these sounds vary in frequency, length, and volume, it’s usually hard to remove them.
How to Avoid Unwanted Sounds
There are different steps and measures you can take to reduce unwanted sounds. Keep in mind that it’s not possible to completely remove them.
On Microphones
- Check your environment – Devices such as TVs, radios, air conditioners, fans, etc., can produce a significant amount of noise that can interrupt your recording. Turn off electrical appliances in your immediate surroundings to eliminate the noise coming from them. Moreover, make sure to check the cables. If other cables are placed directly over the audio input, they might interfere with your microphone.
- Speak clearly – Speak clearly and directly into the mic to create a recording where you can easily fix the ambient noise through a program.
- Choose the right microphone – if you’re on the market for a new mic, make sure to choose the one that suits you best. Look for a low self-noise rating that will cancel out the mic noise. Moreover, keep in mind that different mics have different sensitivity levels. For example, dynamic mics usually have low sensitivity, while condensers have higher sensitivity.
- Microphone windshield – a foam or fur mic cover cancels out the noise produced by wind or heavy breathing. If you’re often recording outside, this is something you must have if you want to produce clear, quality recordings.
- Pop filter – if you want to prevent plosives from popping up, you need to get a pop filter for your mic. This lollipop-shaped filter eliminates the explosion of sounds and is excellent in reducing background noise. Some mics come with the filter built-in, while some require you to purchase it separately.
- Shock mount – depending on the type and model, mics can be very sensitive to different sounds. A shock filter is a great way to prevent shocks and vibrations that come from mic handling. If you’re keeping your mic on a stand, a shock mount will efficiently reduce the noise and vibrations coming from the mic and the people walking around it.
- Filters – you can use various filters to emphasize sounds of one frequency and reject sounds of another frequency:
- Bandpass – used to separate a signal within one frequency from signals within other frequencies.
- Band-reject – used to remove an unwanted frequency while almost not affecting the other frequencies at all.
- Low-pass filter – used to remove high frequencies and permit only the low ones. It rejects the frequencies above its cut-off.
- High-pass filter – used to remove low frequencies and permit only the high ones. It rejects the frequencies below its cut-off.
- All-pass – used to change the signal’s phase.
- Equalizer – by equalization, you can play with the frequency levels to remove the unwanted noise. You can reduce the frequency of predominant sounds and increase the frequency of the missing ones.
On Headsets
- Make sure the headsets are plugged in correctly. The headsets need to be plugged into the headphone jack – not the audio jack.
- Change the power socket – some sockets can be louder than others. If the noise persists, try changing the power socket.
- Let your laptop run on battery – even though you might not notice it, if your laptop is connected to the power cable, it may produce more noise. If you want to reduce sound interference, switch your laptop to battery power.
- Check your environment – turn off electrical devices that aren’t necessary. Check the cables to make sure there’s no magnetic interference. Also, close the windows, move away from vents, close down the programs that make your laptop noisy, etc. All these tricks help you reduce the noise coming from your surroundings.
Noise Reduction in Windows
Windows offers built-in options that help remove mic background noise. The available options depend on the hardware and audio drivers you have installed on your Windows. If you want to reduce the background noise in Windows, follow the steps below:
- Open the Start menu.

- Start typing “Control Panel” and open it.

- Tap “Hardware and sound.”

- Tap “Sound.”

- Under the “Recording” tab, select the mic you’re using and tap “Properties.”

- Go to the “Levels” tab.

- If you’re experiencing a lot of background noise, reduce the “Microphone boost.” Try reducing it to +10.0 dB. The mic will now be more sensitive to your voice, but it will also pick up background noises easily.

- Increase “Microphone Array” to 100. This will enable other people to hear you easily.

- Tap “Apply.”

- Test your mic to see if the sound has improved.
- Depending on your audio hardware, you might have the “Enhancement” tab. If you do, open it.
- Enable the “Noise cancellation” or “Noise suppression” feature.
- Once you’re done, tap “Ok.”

Noise Reduction in Mac
- Tap the Apple icon.

- Tap “System Preferences.”
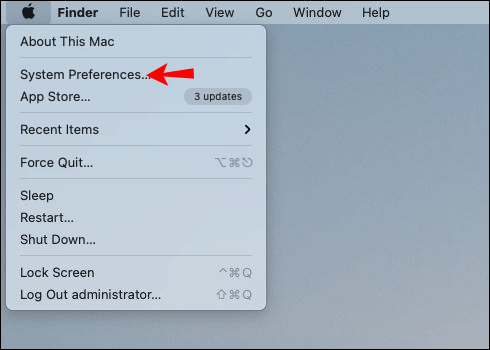
- Tap “Sound.”

- Find the “Ambient Noise Reduction” feature.
- Mark the checkbox next to “Use ambient noise reduction.”
- Move the slider until you find the right balance between sound volume and noise.
How to Use Software to Reduce Background Noise
Nowadays, you can find different programs to edit recordings to reduce the background noise level. Here are some of the most popular programs:
Besides these, there are numerous noise reduction programs available on the internet. If you want to try out some of them, type “free noise reduction software” in your browser, and start experimenting.
Additional FAQs
How do I make my mic input louder?
Windows 10
You can make your mic louder by following the steps below:
1. Open the Start menu.

2. Start typing “Control Panel” and open it.

3. Tap “Hardware and sound.”

4. Tap “Sound.”

5. Under the “Recording” tab, select the mic you’re using and tap “Properties.”

6. Go to the “Levels” tab.

7. Use the slider to increase “Microphone Boost.”


8. Test your mic to see if it worked.
Mac
1. Tap the Apple icon.

2. Tap “System Preferences.”

3. Tap “Sound.”

4. Under the “Input” tab, select the microphone you’re using.
5. Adjust the “Input volume” slider.
6. Speak in your normal voice to test it.
Background Noise Isn’t Your Choice
Now you’ve learned how to reduce the background noise on a mic. Unwanted sounds can be disruptive, annoying, and affect the sound quality. Although you might not be able to get rid of them completely, there are several ways to reduce them to a minimum and produce high-quality content.
Have you ever experienced problems with background noise? What was your solution? Tell us in the comment section below.
Original page link
Best Cool Tech Gadgets
Top favorite technology gadgets


0 comments:
Post a Comment