Canva is a great picture editing app that provides users with all the necessary tools for creating beautiful designs. It gives you full freedom over the text style, placement, orientation, and other features. If you’re wondering how to customize text in Canva, we’re here to help.

In this guide, we’ll explain how to curve and animate text in Canva. Additionally, we’ll provide instructions on making text transparent and vertical. Read on to find out how to bring your creative ideas to life.
How to Make Text Curve in Canva?
Unfortunately, there’s no quick way to curve text in Canva. You’ll have to reposition every letter manually. In this section, we’ll list instructions for curving text on different devices.
Using iPhone
To curve text in Canva on iPhone, follow the steps below:
- Create a new or existing file in Canva.
- Tap the plus icon, then select “Elements “and “Shapes.”

- Select a circle, then tap “Duplicate” to add another circle to your template.

- Tap and hold a corner of the blue frame around the second circle. Drag it to make the circle smaller.

- Make sure the smaller circle is positioned exactly in the middle of the larger circle.

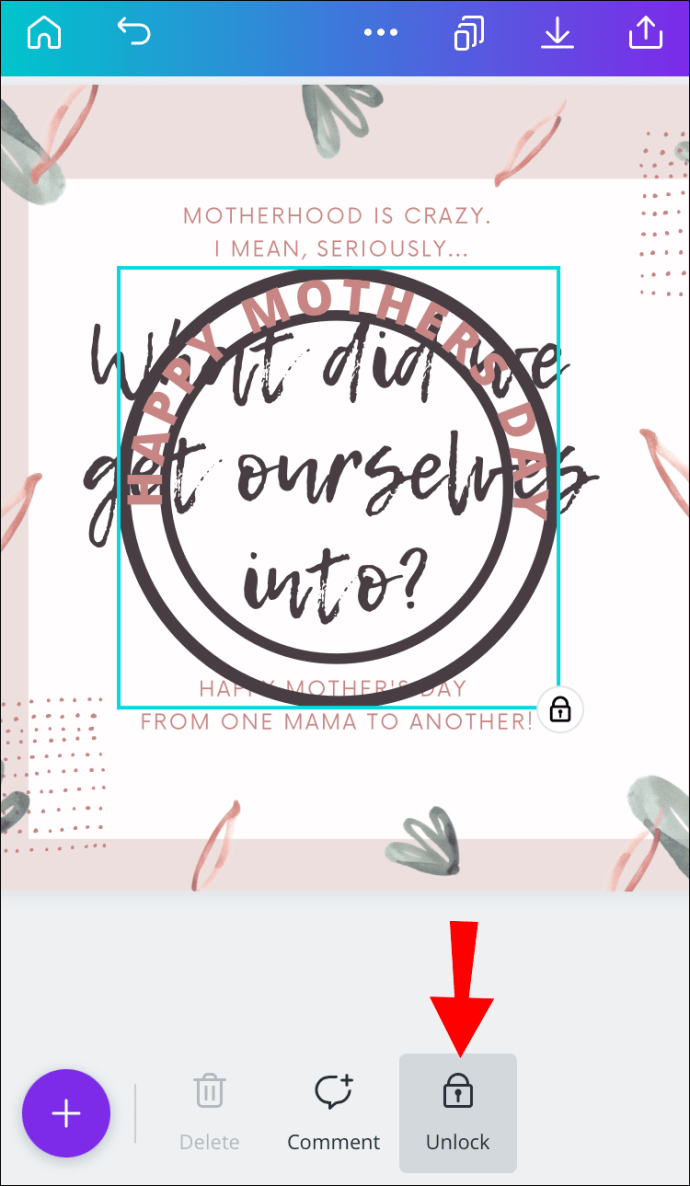
- Tap the lock icon at the bottom of your screen to prevent the circles from moving around.

- Tap the plus icon and select “Text.” Enter the first letter of the text you wish to use.

- Tap and hold the first letter, then drag it to position it between the two circles. It should be located slightly to the side rather than in the center, depending on the length of your desired text.

- Rotate the letter to place it perpendicular to your circles.

- Repeat steps 7-9 with the last letter. Ideally, it should be located exactly opposite the first letter.

- Tap the first letter, then select “Duplicate.” Change the next letter and repeat steps 9 and 10.
- Do the same thing with all letters of your text.
- Tap the first letter, then drag a corner of the blue frame to select all letters.
- Select “Group.” Adjust the text position if needed.

- Tap the lock icon to unlock the circles. Delete the circles or change color if needed.
Using Android
Curving text in Canva on Android isn’t different from doing it on an iPhone. Follow the instructions below:
- Create a new or existing file in Canva.
- Tap the plus icon, then select “Elements “and “Shapes.”

- Select a circle, then tap “Duplicate” to add another circle to your template.

- Tap and hold a corner of the blue frame around the second circle. Drag it to make the circle smaller.

- Make sure the smaller circle is positioned exactly in the middle of the larger circle.

- Tap the lock icon at the bottom of your screen to prevent the circles from moving around.

- Tap the plus icon and select “Text.” Enter the first letter of the text you wish to use.

- Tap and hold the first letter, then drag it to position it between the two circles. It should be located slightly to the side rather than in the center, depending on the length of your desired text.
- Rotate the letter to place it perpendicular to your circles.

- Repeat steps 7-9 with the last letter. Ideally, it should be located exactly opposite the first letter.
- Tap the first letter, then select “Duplicate.” Change the next letter and repeat steps 9 and 10.

- Do the same thing with all letters of your text.
- Tap the first letter, then drag a corner of the blue frame to select all letters.

- Select “Group.” Adjust the text position if needed.

- Tap the lock icon to unlock the circles. Delete the circles or change color if needed.

On Mac
The instructions for curving text in Canva on Mac are slightly different than those for a mobile app:
- Create a new or existing file in Canva.
- From the left sidebar, select “Elements,” then “Shapes.”

- Select a circle, then click “Duplicate” to add another circle to your template.

- Click and hold a corner of the blue frame around the second circle. Drag it to make the circle smaller.
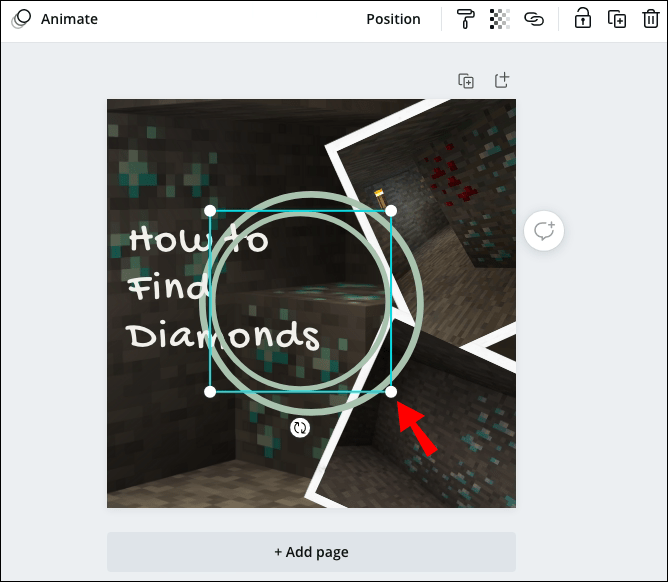
- Make sure the smaller circle is positioned exactly in the middle of the larger circle.
- Click the lock icon to prevent the circles from moving around.

- From the left sidebar, select “Text.” Enter the first letter of the text you wish to use.
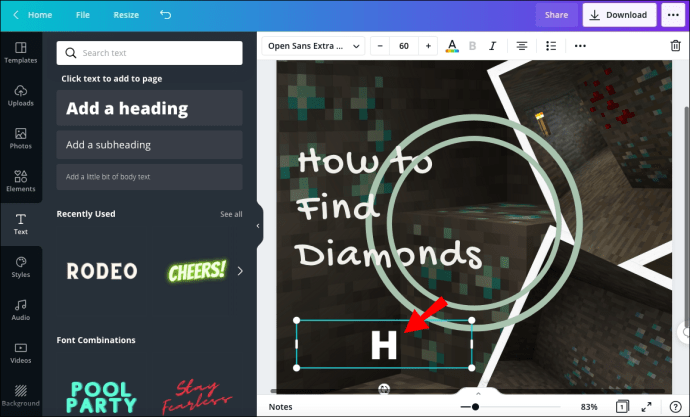
- Drag the letter using a four-arrowed cursor and position it between the two circles. It should be located slightly to the side rather than in the center, depending on the length of your desired text.

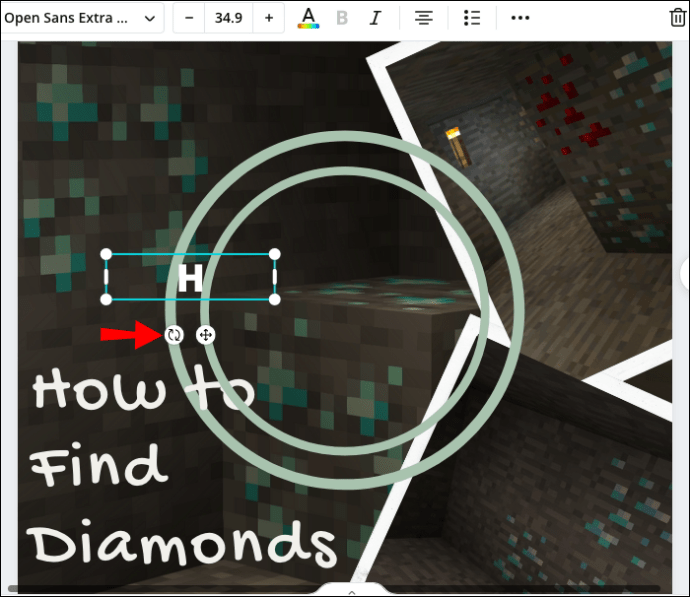
- With a curved cursor, rotate the letter to place it perpendicular to your circles.
- Repeat steps 7-9 with the last letter. It should be located opposite the first letter.

- Select the first letter, then click “Duplicate.” Change the next letter and repeat steps 9 and 10.
- Do the same thing with all letters of your text.
- Click the first letter and hold your mouse, then drag a corner of the blue frame to select all letters.
- Click “Group,” located at the upper right corner of your screen. Adjust the text position if needed.

- Click the lock icon to unlock the circles. Delete the circles or change color if needed.
On Windows 10
If you’re a Windows user, follow the steps below to curve text in Canva:
- Create a new or existing file in Canva.
- From the left sidebar, select “Elements,” then “Shapes.”

- Select a circle, then click “Duplicate” to add another circle to your template.

- Click and hold a corner of the blue frame around the second circle. Drag it to make the circle smaller.
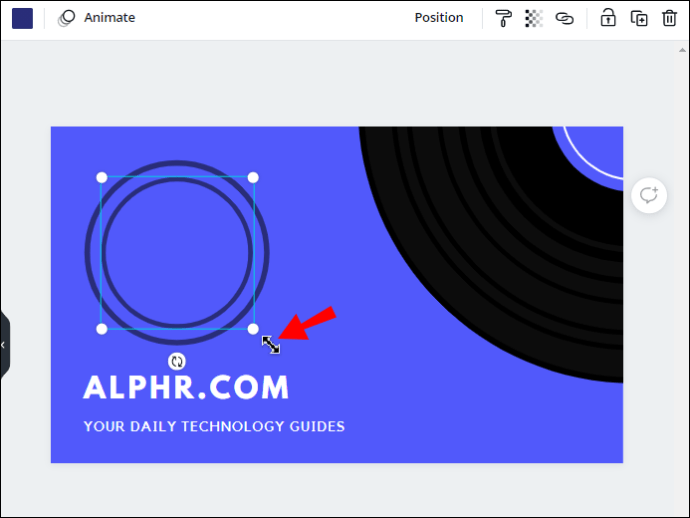
- Make sure the smaller circle is positioned exactly in the middle of the larger circle.

- Click the lock icon to prevent the circles from moving around.

- From the left sidebar, select “Text.” Enter the first letter of the text you wish to use.
- Drag the letter using a four-arrowed cursor and position it between the two circles. It should be located slightly to the side rather than in the center, depending on the length of your desired text.
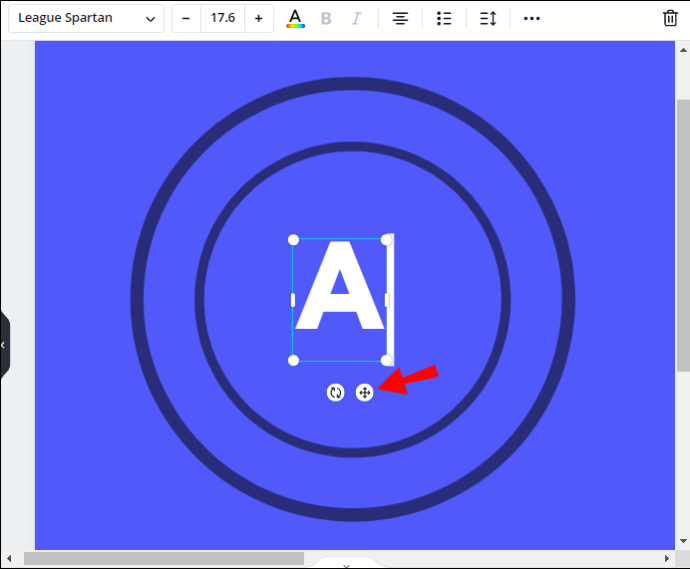
- With a curved cursor, rotate the letter to place it perpendicular to your circles.

- Repeat steps 7-9 with the last letter. It should be located opposite the first letter.
- Select the first letter, then click “Duplicate.” Change the next letter and repeat steps 9 and 10.

- Do the same thing with all letters of your text.
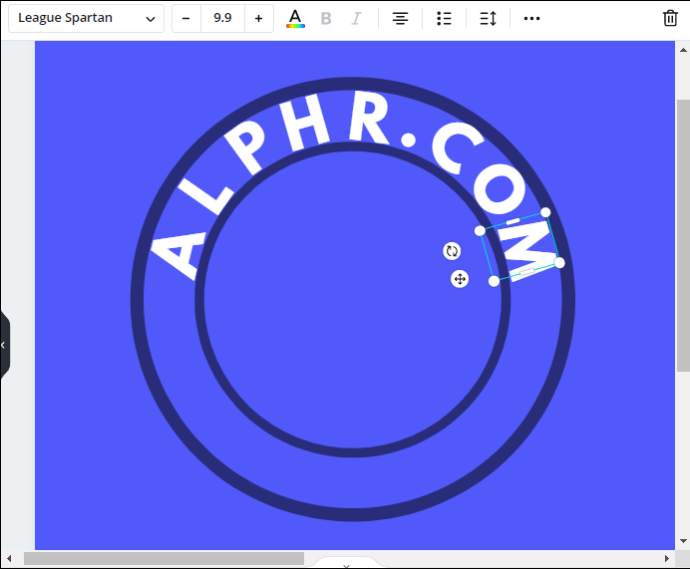
- Click the first letter and hold your mouse, then drag a corner of the blue frame to select all letters.
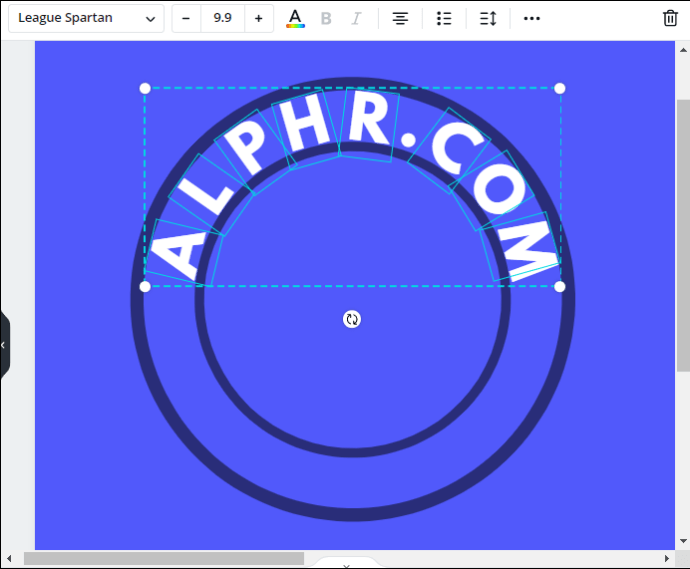
- Click “Group,” located at the upper right corner of your screen. Adjust the text position if needed.
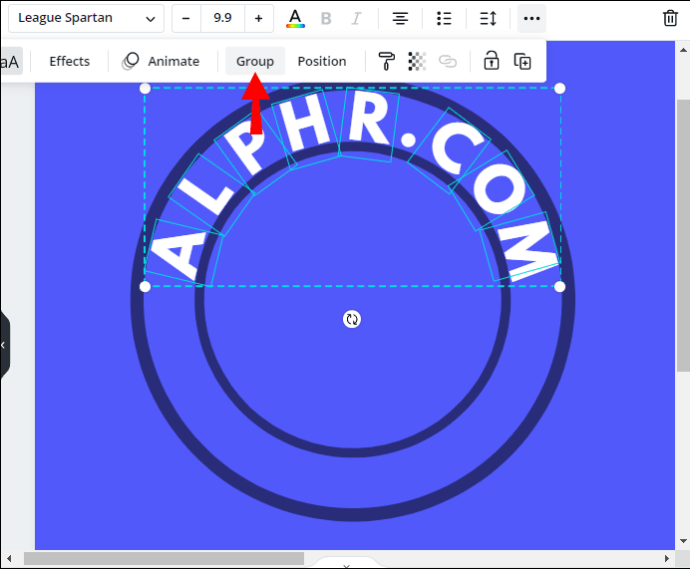
- Click the lock icon to unlock the circles. Delete the circles or change color if needed.

How to Animate Text in Canva?
Animating text in Canva is much easier than curving it – find the instructions for your device below.
Using iPhone
iPhone users can animate text in Canva mobile app in only four simple steps:
- Open Canva and type in “Animated” into the search box. You’ll see all the animated template options. Choose the one you prefer.
- Tap the plus icon and select “Text,” then type in the desired text.
- From the menu at the bottom of your screen, select “Animate.”
- Select the animation style you prefer and tap “Done.”
Using Android
Animating text in the Canva Android app isn’t any different from doing it in the iOS app:
- Open Canva and type in “Animated” into the search box. You’ll see all the animated template options. Choose the one you prefer.
- Tap the plus icon and select “Text,” then type in the desired text.
- From the menu at the bottom of your screen, select “Animate.”
- Select the animation style you prefer and tap “Done.”
On Mac
On Mac, you don’t have to create a special template for animating text. You can animate any element in an already existing file by following the steps below:
- Open a new or existing file in Canva.
- Type in the text you wish to animate and adjust its position, color, size, etc.
- Select your text. From the menu above your template, select “Animate.”
- Select the desired animation style. It will be applied instantly.
On Windows 10
To animate text in Canva for Windows, follow the instructions below:
- Open a new or existing file in Canva.
- Type in the text you wish to animate and adjust its position, color, size, etc.

- Select your text. From the menu above your template, select “Animate.”

- Select the desired animation style. It will be applied instantly.

Frequently Asked Questions
Now that you know how to curve and animate text in Canva, you may want to find other ways of customizing it. In this section, we’ll explain how to rotate and make the text transparent in the app.
How to Make Text Vertical in Canva?
Rotating text in Canva is very simple – follow the steps below:
1. Open a Canva file and add the desired text.
2. Select the text. Click and hold the rotate icon next to the blue frame around your text.

3. Drag your mouse to change the text orientation until it’s vertical.

4. Release your mouse to fix the text in this position.
How to Make Text Transparent in Canva?
Canva allows you to adjust the transparency level of any element to your preference. To do this, follow the instructions below:
1. Open a Canva file and add the desired text.
2. Select the text.

3. Select “Transparency” located at the bottom of your screen and drag the slider to adjust it.

4. Click “Done” when satisfied with the result.
Unlimited Possibilities
Hopefully, our guide has helped you to edit the text in Canva to your liking. Making eye-catching designs with Canva is simple. By mixing different features, you can create stylish blog posts, collages, posters, and more. Animated text looks especially great in presentations and Instagram stories. Use your imagination and keep experimenting to get the best results with the app.
Do you know any Canva alternatives that may offer a simpler way of curving text? Share your experiences in the comments section below.
Original page link
Best Cool Tech Gadgets
Top favorite technology gadgets


0 comments:
Post a Comment